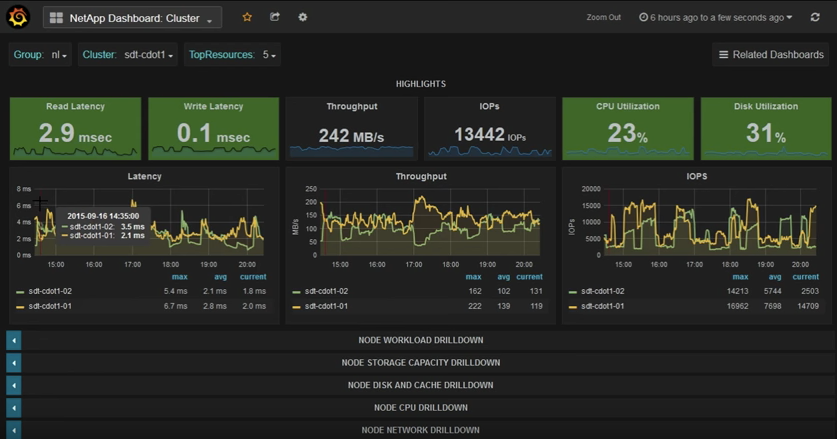
For those that went to either NetApp Insight US or EMEA, the grafana UI used for the Neto’s wicked demo looks very familiar.
NetApp recently released a tool called Harvest, which extracts information from the ONTAP nodes/clusters as well as OnCommand Unified Manager (OCUM) and presents such information in a really cool dashboard. This advaced Performance Monitoring already includes pre-built metrics for both performance and capacity that will allow any NetApp admin to quickly look at many, many key aspects of the environment, and quickly discern whether or not there are any bottlenecks/issues.
I like to think of this tool as OCUM (OnCommand Unified Manager) in steroids, with a hint of OPM (OnCommand Performance Manager) (maybe the other way around) and a great UI. Instructions here. This tool is so cool, we are starting to offer this to our customers.
The complete solution is composed of NetApp’s Harvest tool, Graphite for DB and parsing and Grafana as the Web UI. Harvest is available to download from NetApp’s support page, and both Graphite and Grafana are open source (free).
Chris Madden (NetApp), has created a cool video about this solution, as well as step-by-step deployment instructions here.
Installing VMware vSphere on hardware come with many options when it comes to the location of the many partitions necessary for ESXi. ESXi can be installed on USB, SD (mini) cards, local storage, and boot from LUNs. Before you deploy your ESXi hosts, you should be thinking about your design and the limitations (is any) of each of the boot options.
Remember that ESXi has several partitions that are created during its installation.
7 Partitions:
System Partition
Linux Native – /scratch
VMFS datastore
n/a
Linux Native /bootbank
Linux Native /altbootbank
vmkDiagnostics
Linux Native /store
One thing to note is that partition 2 & 3 (/scratch & VMFS) are not present on the image below. This is because my ESXi host was installed on an SD card.
This post will focus on the vmkDiagnostics partition. VMware recommends that this partition is kept on local storage unless it is a diskless installation, such as boot from SAN. I have seen a rapid increase on boot from SAN as more and more people are transitioning into Cisco’s UCS blades. So, if you are doing this or planning on booting from SAN, make sure that you create a core dump partition for your hosts. You have a few options to do this.
You could have the core dumps on the boot LUN; however, it is recommended that a separate LUN is created for this partition.
Independent HW iSCSI only (keep reading).
If you set the diagnostic partition to be at the boot LUN, make sure only that host has access to it.
This should already be the case anyway. A boot LUN should only be accessible to the specific host.
IF you create a separate LUN for the diagnostic partition, you can share this LUN among many hosts.
You can also set up a file as a core dump location on a VMFS datastore (see caveat below).
That sounds pretty easy right?!? Yes but wait, there is a big caveat here.
You CANNOT place the diagnostic partition on any of the options above if using software iSCSI or hardware dependent initiators (iBFT). This can only be done via independent hardware iSCSI. More info here. This is not version dependent at the time this post was written.
Now what?
If do not have any hardware HBAs, you have a couple of options.
The recommended option is to set up ESXi Dump Collector
Requires configuration on vCenter (Windows and VCSA)
Available for vSphere 5.0 and later
Consolidates logs from many hosts
Easily deployed via Host Profiles or esxcli commands
You could also put this on USB storage, but this requires disabling the USB Arbitrator service, which means that you will not be able to use USB passthrough on any VM.
A couple of weeks ago, NetApp’s conference (Insight) took place in Vegas. It took me a week to recuperate (Vegas) and absorb all the great content, so better late than never. While I am not new to IT conferences like VMworld, CiscoLive and Microsoft Ignite (TechEd) among others, this was my first NetApp Insight I was able to attend. I was on the customer side for 15 years, and when I jumped to the partner side, the conference was opened to customers.. it figures. The great thing is that everyone can go to Insight now. I can see why Insight was previously focused on partners, and employees, as NetApp’s conference is more technical than others in my humble opinion, and I love that.
As far as the content, there were a lot of cool technology announcements. I am happy to see that NetApp is innovating again. I can see how having to support both 7-mode and clustered-mode development was really taking a toll on producing new features, but that is now history. First thing that comes to mind was the expansion of SnapMirror. Now that is has been overhauled, according to the announcement, it will make it across all of NetApp’s products. This is huge, think of AltaVault, e-series, etc. all with SnapMirror. Speaking of SnapMirror, another up and coming release is SnapCenter which is the new Central Management interface for all SnapManager. YESS!! Finally. Like I said before, I was on the customer side for a very long time, and you know how tedious it is to have to manage tens or even hundreds of instances of SME, SMSQL, SMSP, SDW, etc.
Also part of the centralized management that we all love, Cloud ONTAP was demoed with OnCommand Cloud Manager. You can move your data between public clouds (AWS, Azure, etc.) with a quick drag-and-drop. In the demo, they literally clicked on an AWS cloud and dragged it into an Azure cloud, moving the data locality in seconds. This was a pretty awesome demo.
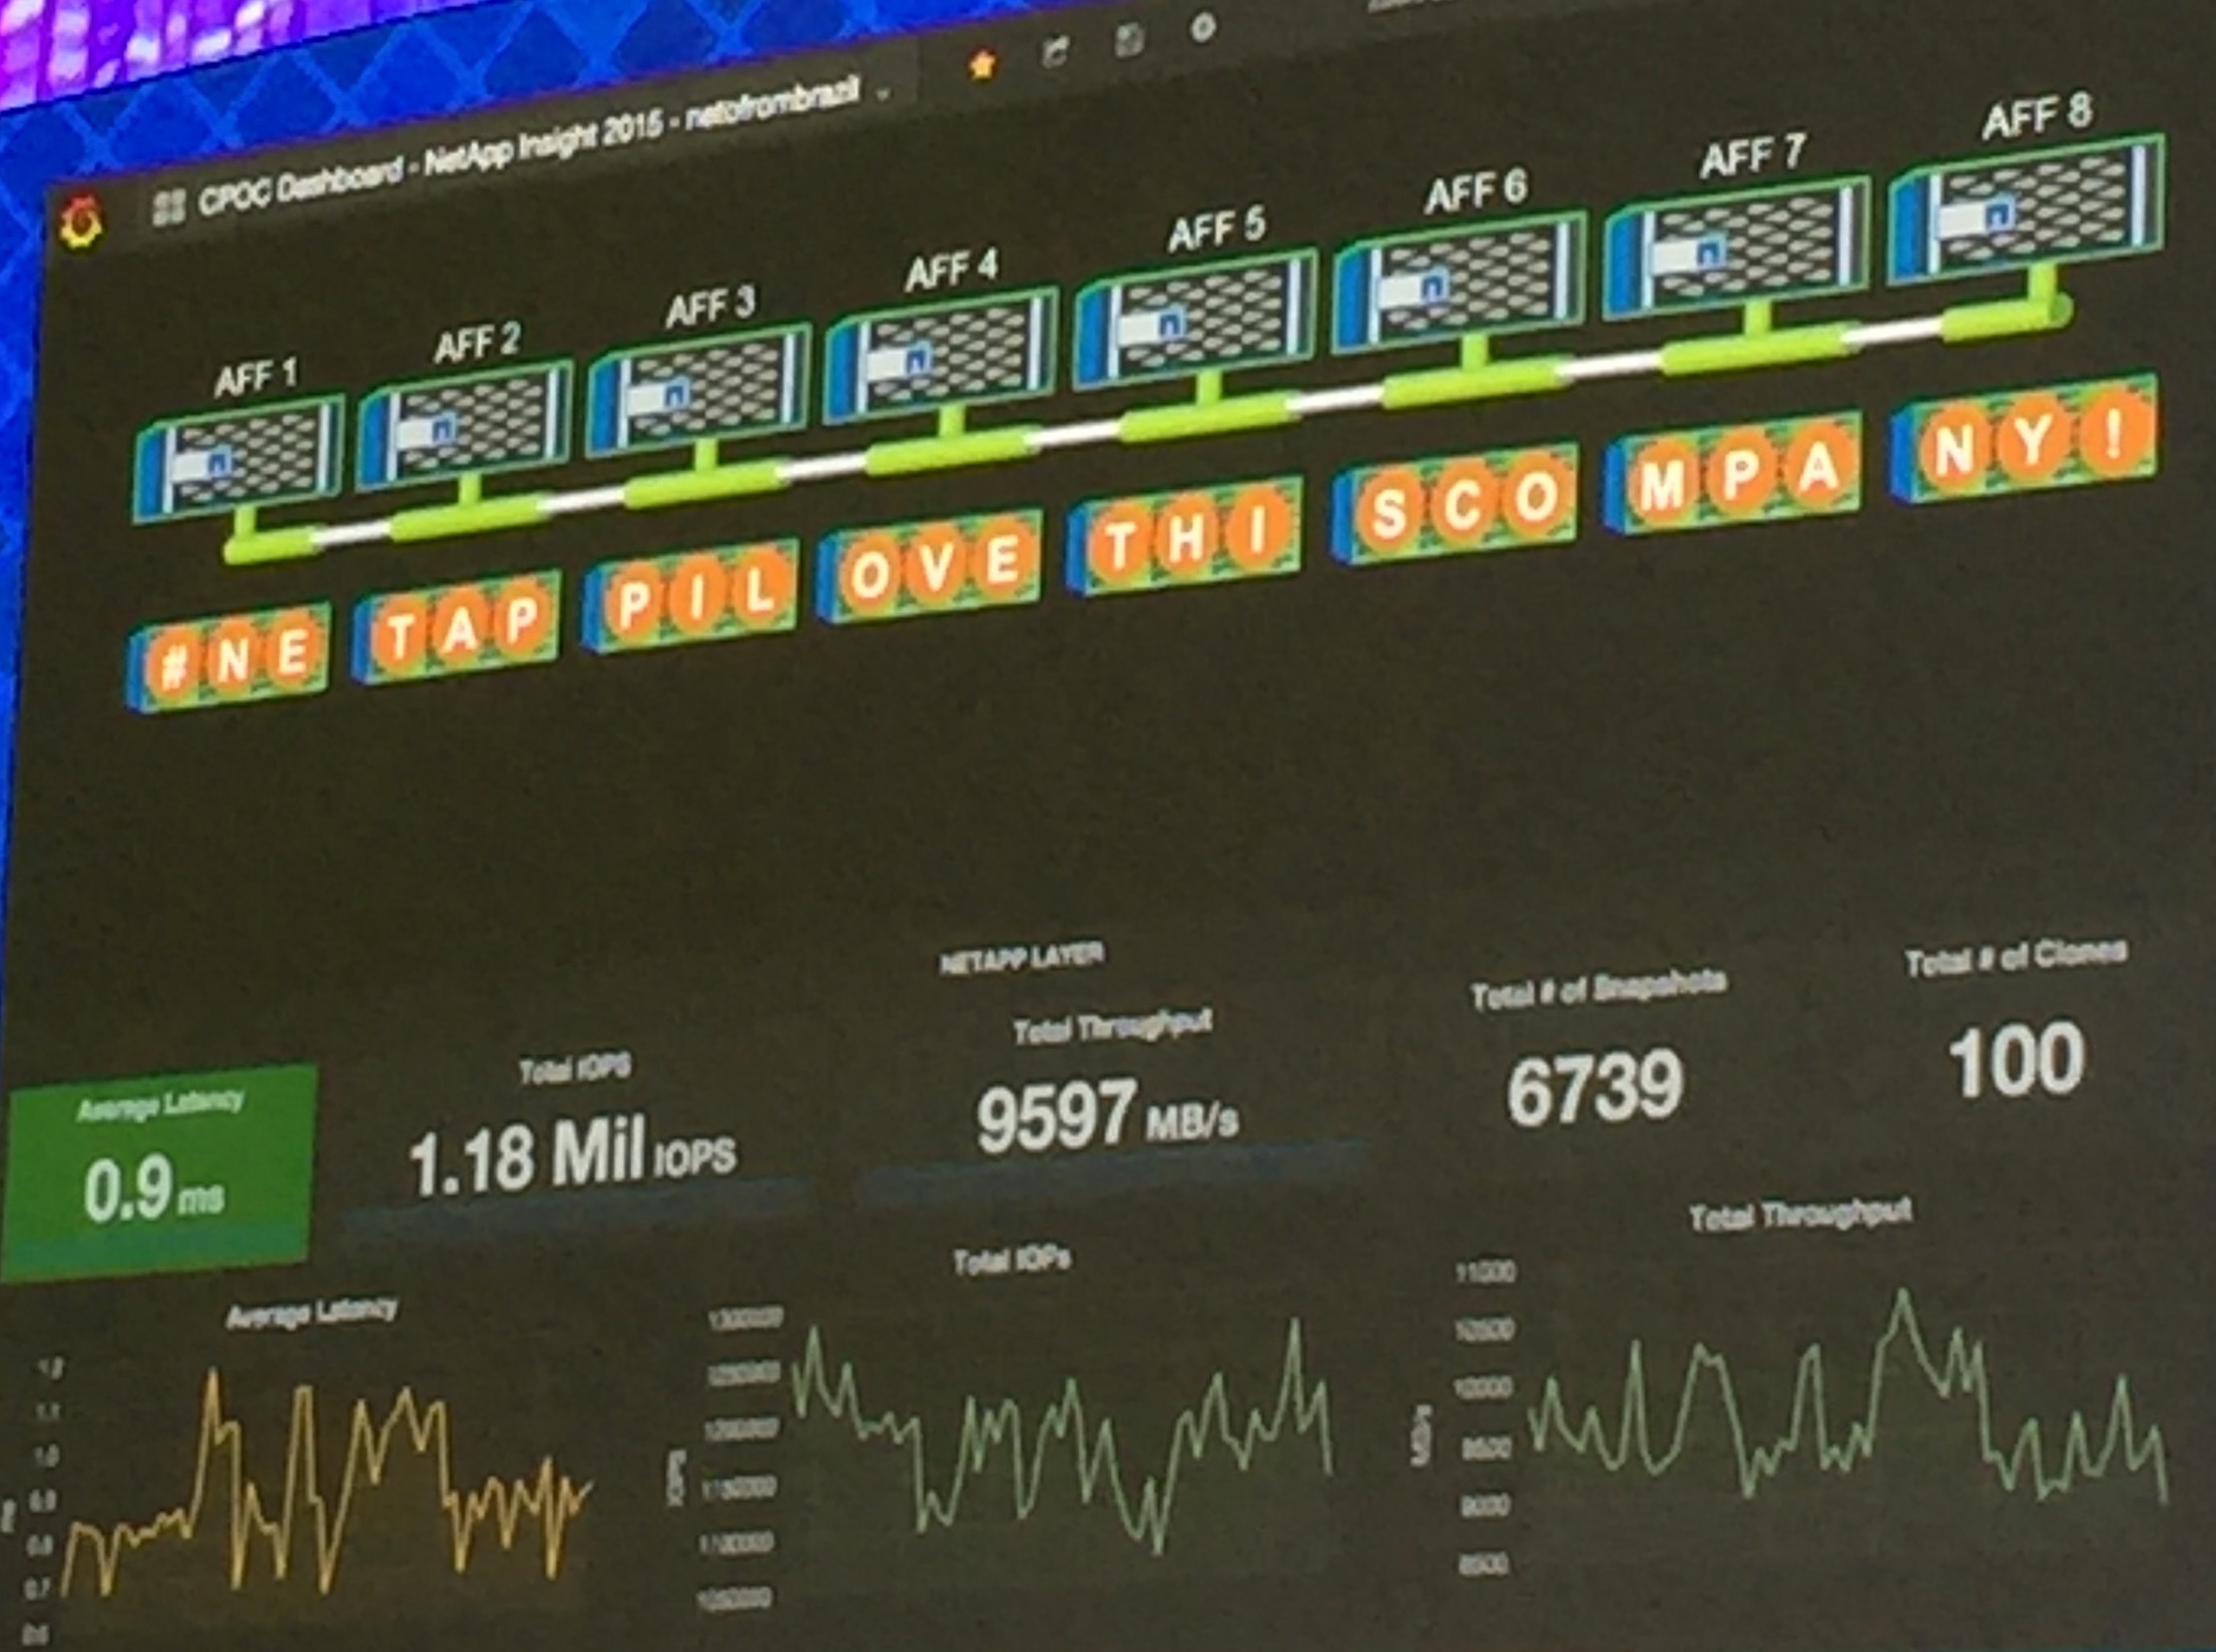
Earlier this year, NetApp announced their All Flash Array (AFA). Although many storage vendors came out with their version first, NetApp took its time to do it right. To prove it, they received outstanding results from SPC1 benchmark test, not only surpassing all of its competitors but also breaking records. So what did NetApp do to highlight this great accomplishment?!?! They made it better, faster, stronger. A demo by Neto From Brazil, demonstrated > 70% gains from previous results, achieving over 1.18M IOPS with UNDER 1ms latency with an 8-node AFF cluster. This is pretty amazing if you ask me.
Check out the demos in the video below
As always, check back later for new stuff in the IT realm…
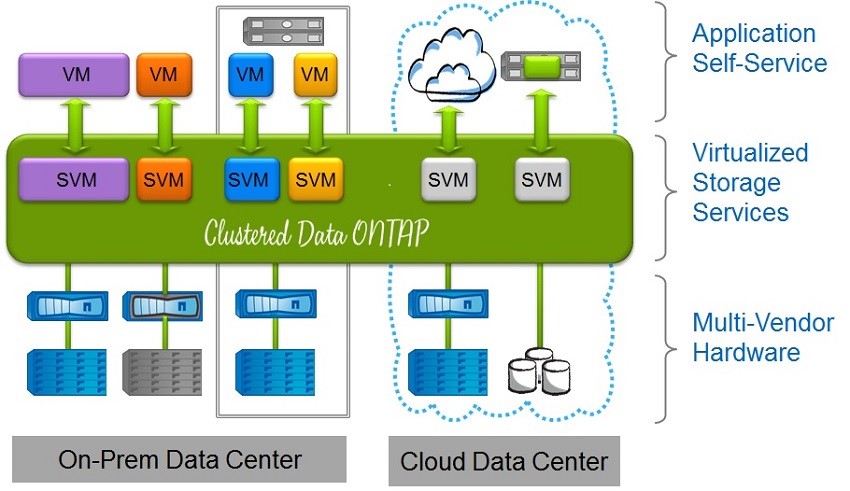
Al igual que VMware ha sido el pionero de la virtualización de servidores, NetApp parece ser el jugador de virtualización para vencer en el campo del almacenamiento en este momento. Aunque ONTAP de NetApp clustered-mode (C-Mode) no es una nueva versión,, los usuarios en 7-mode les esta tomando un tiempo no solo el entender, sino también poner en práctica clustered-mode dada su complejidad en comparación con 7-mode. Pero una manera fácil de pensar en C-Mode, es encontrar las similitudes con vSphere de VMware.
Clustered-mode rompe el aspecto físico de almacenamiento en una configuración virtualizada donde varios ambientes de almacenamiento virtuales se pueden crear para segregar las diversas configuraciones lógicas. C-Mode puede ser un gran caso de uso de un proveedor de servicios de nube pública, donde es necesaria la segregación de las máquinas virtuales de almacenamiento; pero vamos a tener en cuenta, que este tipo de segregación también puede ser utilizado en gran medida dentro de un ambiente privado para muchos casos de uso.
Habiendo recientemente alcanzado una maestría en seguridad Cibernética y Aseguramiento de la Información (CIA), he aprendido un par de cosas acerca de la protección no sólo de los entornos públicos, sino también asegurarse de que somos internamente seguros. Su empresa es sólo tan fuerte como su eslabón más débil. Después de todo, un gran número de los ataques se generan internamente por los usuarios por la falta de conocimiento o incluso los usuarios maliciosos. A través de la virtualización del almacenamiento y la segregación de las máquinas virtuales de almacenamiento, podemos lograr no sólo una mejor seguridad, sino también una mejor administración a través del uso de las políticas.
Este ambiente de almacenamiento virtualizado permite una relación más directa con los ambientes de servidores virtualizados, tales como VMware, donde se necesita un control más granular. En mi humilde opinión, NetApp C-Mode y VMware vSphere no son muy diferentes entre sí. Mientras me preparaba para mi certificación NCDA para NetApp (Modo C), no pude dejar de notar las similitudes en sus arquitecturas. C-Mode actúa como el hipervisor, o en este caso vSphere, y ambas plataformas tienen máquinas virtuales que actúan como identidades independientes. Tales identidades tienen sus propias personalidades, como direcciones IP, información de acceso, asignaciones a una red subyacente física, etc.
Mientras VMware utiliza servidores para la plataforma física, NetApp C-Mode utiliza su software hardware y ONTAP de datos para ofrecer virtualización de almacenamiento; que una vez unido con VMware, se convierten en una solución muy potente para las empresas de todos los tamaños. Está claro que estoy bebiendo el cool-aid de NetApp, pero creo que su tecnología, además de productos de VMware, representan grandes soluciones para SMB empresas grandes. Las dos empresas (NetApp & VMware) ofrecen incluso mejores integraciones y soluciones a través de la utilización de VASA, VAAI, VVols, VSC, etc. Más en ellos pronto …
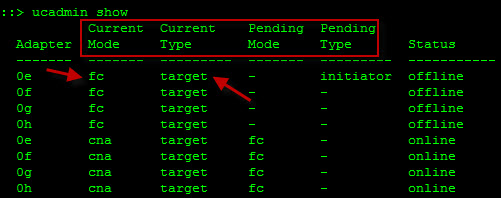
Puertos NetApp UTA2 es probable que sean configurados como puertos FC al recibir un nuevo systema. Al menos esa ha sido mi experiencia. Eso es perfectamente bien si va a utilizar esos puertos como puertos de FC. En el caso de que usted quisiera utilizar estos puertos como puertos de 10 GbE, tendrá que cambiar el modo de los puertos. Esta configuración se debe hacer a través de la CLI.
Para convertir UTA2 o CNA puertos a 10 GbE, tendrán que hacer los siguientes pasos.
Compruebe la configuración actual
Desactive los adaptadores
Cambiar el modo de los adaptadores
Habilitar los adaptadores
Reboot el node de clúster
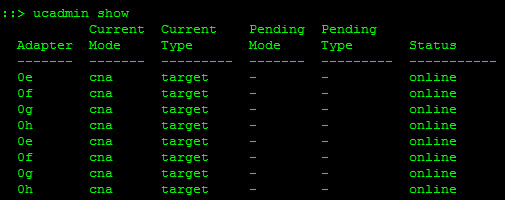
Compruebe la configuración actual utilizando el comando “ucadmin show“. Este comando mostrará el estado, estado actual y pendientes, así como el tipo actual y pendiente de los puertos UTA2
Deshabilitar el adaptador depende del tipo actual del adaptador
Si el tipo = TARGET use esta linea “fcp adapter modify -node <filer_node_name> -adapter 0e -state down”
Si el tipo = Initiator use esta linea “storage disable adapter <adapter_name>”
NOTA: Este es un comando de 7-mode, entoces va ha tener que correr esta linea usando system node run “system node run -node <node_name> -command <storage command>” or “system node run <node_name>“ y después la linea anterior. Tantas opciones…
Cambie el modo del adaptador usando este comando”ucadmin modify -node <node_name> -adapter <adapter_name> -mode cna”
Una vez que haya cambiado todos los modos de los adaptadores. Habilitar los adaptadores y repetir en el otro node.
Comandos:
fcp adapter modify -node <node_name01> -adapter 0e -state up fcp adapter modify -node <node_name01> -adapter 0f -state up fcp adapter modify -node <node_name01> -adapter 0g -state up fcp adapter modify -node <node_name01> -adapter 0h -state up
Reinicie un node a la vez en un momento fuera del horario de producción, por supuesto. (system node reboot <node_name>)
Ejecutar “ucadmin show” una vez más para verificar todo que todo se ve bien.