What is vSphere+ ?

Today, VMware announced vSphere+ and vSAN+, but what does that mean? Is it a new version?

In simple terms, both vSphere+ and vSAN+ are offerings of the existing vSphere and vSAN products. Think of it in term of purchasing a vehicle. You know what product you want, let’s say a Porsche, but you have the option of doing a capital expense (pay cash – excluding financing for simplicity), or you can lease. The product remains the same, which in this case is the Porsche vehicle you want to buy, but the offerings are different. You can make a purchase and pay the balance at time of exchange (capital expense) or you can lease it and pay as you.

Both vSphere+ and vSAN+ allows you to purchase the same vSphere and vSAN products you know and love, but now you can move to subscription and pay-as-you-grow. This is one of the differences between vSphere and vSphere+. Both products are deployed on-premises, managed from vCenter UI, so there is no change to the way you deploy, manage and configure vSphere and vSAN. However, there are additional advantages to both vSphere+ and vSAN+.

vSphere+ does not only allow you to move to subscription(OpEx) model, but it also allows your on-premises infrastructure to the cloud WITHOUT migrating any workloads, vCenters or ESXi hosts to the cloud. Your on-prem infrastructure securely becomes cloud connected.

Once connected, vSphere+ delivers those cloud benefits businesses seek and love to on-prem. Some of the benefits include:

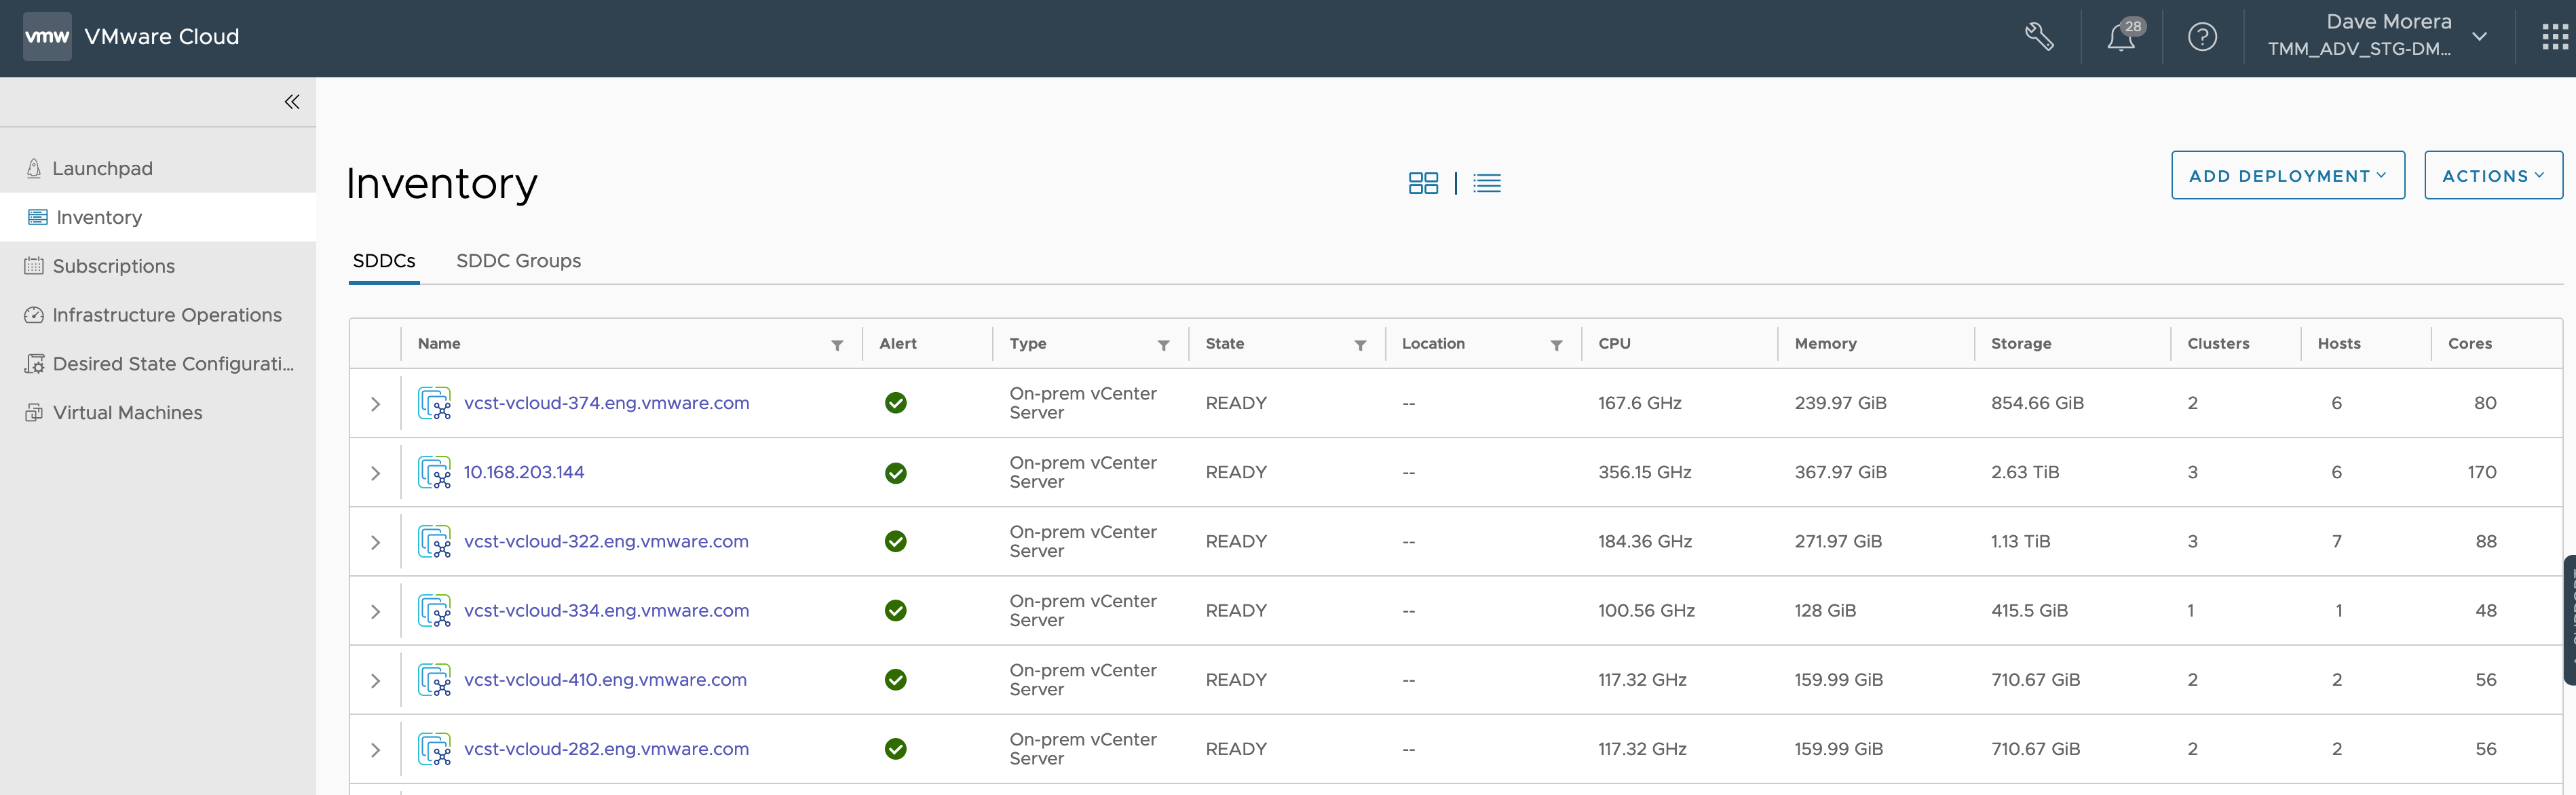
  • Centralized Management for ALL vCenters without limit
  • Simplified and Faster vCenter upgrades
  • Centralized Operations view of alert, event and security posture of the global infrastructure regardless of the location
  • Identify configuration drift among on-premises vCenters
  • Move to subscription from a simple centralized cloud console
  • Virtual Machine inventory and deployment to any vCenter while also being able to leverage vSAN datastores with vSAN+

These are just some of the features, and more coming soon.

vCenter Server Reduced Downtime Upgrade

I have seen some questions coming in about Reduce Downtime Upgrade features lately, so I figured I’d share some more information about this. This feature was introduced in vSphere 7.0 Update 3 and it provides a new way of doing migration based upgrades for vCenter servers.

Reduced Downtime Upgrade (RDU) simplifies the migration process and reduces downtime (as the name implies) for vCenter while the data is being moved/copied from the old vCenter to the new vCenter. So the only downtime happens when the services on the old vCenter are stopped and started on the new vCenter. The data is copied almost in a vMotion type of way. Pretty slick.

The main question I see is: Does this apply to all deployment types including On-Premises and Cloud deployments?

The answer is NO. This feature (as of right now) only applies to VMC on AWS and Project Arctic. So for now, RDU is not available/supported for on-premises deployments, but that’s not to say it will never be supported on-premises in the near future. Also RDU is only available via API at the moment, and for the VMC on AWS and Project Arctic use cases, the vCenter upgrade is done by VMware Site Reliability Engineers (SRE), so you as a customer don’t need to worry/trigger the upgrade/update of vCenter server. You can safely pass the burden on to the SREs. That alone can justify moving to VMware’s Project Arctic offering when available IMHO.

Hopefully this post answers some questions. For more information refer to the official blog post here.

VUM Host upgrade fails – Another task is already in progress

I came across this issue a few times already, so I figured it would be good to share the findings, especially since it took me down the rabbit hole.

First off, the error “Another task is already in progress” is kind of obvious but yet does not provide enough detail. I ran into this trying to upgrade 4 hosts in a cluster via VUM, no tasks were running at the time of the upgrade start. This was initiated from VMware Cloud Foundation. Thinking the issue was with VCF I tried to do a direct upgrade from VUM, skipping VCF… but received the same error. Also tested with/without vSAN. NFS, etc.

The issue appeared to be related to a race condition where both the VUM remediation AND this “other task” were trying to run at the same time on that host. From the task console we can see that there was another “install” operation running as soon as VUM was trying to remediate. The Initiator give me a hint, and we can see vcHms “cut in line” a did an install operation.

I started looking into the esxupdate log (/var/log/esxupdate.log), and noticed that the host was trying to install a vib. But this vib was already installed, so what gives?

The name of the initiator and one of the vibs gave me a clue (vr2c-firewall.vib). I was running vSphere Replication on that particular cluster, so I started digging in. To validate my suspicion, I shutdown the VR appliance and attempted to upgrade one host. The upgrade worked as expected with no errors, so I was pretty certain something within vSphere Replication was causing this.

First I needed to ssh into the VR appliance or use the console. You won’t be able to ssh into the appliance before enabling ssh. Log in to the console with the root password and run the script to enable ssh.

/usr/bin/enable-sshd.sh

Within the appliance I looked into the config settings for HMS and discovered that there were 2 vibs that were set to auto install at host reconnect. So it appears there is a race condition when VUM and VR and both trying to do an install task at the same time (at reconnect). Makes perfect sense now.

VR_vib_autoinstall

The ESXI update logs indicated that the vr2c-firewall.vib was the one trying to install. After re-checking the vibs (esxcli software vib list) on all the hosts, I did see this vib was already installed but the task from VR kept trying to install at reconnect.

As I workaround, I decided to disable the auto install of this particular vib by running the following command within the /opt/vmware/hms/bin directory and then restart the hms service:

./hms-configtool -cmd reconfig -property hms-auto-install-vr2c-vib=false

service hms restart

hms-configtool

This workaround worked as a charm and I was able to upgrade the rest of the cluster using VUM. I did not find an official KB about this, and this is by no means an official workaround/fix.

Disclaimer: If you plan to implement this fix, be aware that this is not an official VMware blog, and changes to products may or may not cause issues and/or affect support.

Unable to power on VM “vmwarePhoton64Guest’ is not supported”

I was in the process of deploying vSAN Performance Monitor  and came across an error.

The error pops up as “No host is compatible with the virtual machine”

It further describes the error as “vmwarePhoton64Guest’ is not supported”


The FIX:

Right Click on the vSAN Performance Monitor VM

Select Compatibility> Upgrade VM Compatibility


Select yes for the upgrade. Warning: This step is NOT reversible.


Finally, select the version you want the VM to be compatible with depending on the version you are currently running.


More info about VM Compatibility Settings available here

vSAN 6.7 Upgrade Considerations

On April 17, 2018, VMware released vSphere 6.7. This includes vCenter, ESXi, and of course vSAN. A lot of people are looking to upgrade in order to take advantage of the new features, and enhancements; primarily the H5 client… good bye flash client! Links to more info on what’s new for vSphere and vSAN.

From an HMTL 5 client perspective, the feature parity is about 95%. For vSAN alone, it is about 99%, as we are only missing Configuration Assist, which is still available via the flash client.

I see a lot of people getting confused, and still believe that vSAN is a separate upgrade, just like traditional storage. Fortunately, vSAN is in the kernel, so once you upgrade ESXi you have also upgraded vSAN. Boom!!! Even though the version numbers may not be exact between ESXi and vSAN, they still go hand-in-hand. With that, it is important to understand the steps necessary for a vSAN upgrade.

Based on the nature of vSAN, we need to follow the vSphere upgrade path. This includes checking the VMware Product Interoperability Matrices, not only with your current versions against the versions you are going to upgrade to, but also all the other VMware products such as NSX, SRM, vROps, etc.


Upgrade Process Overview

From an upgrade process perspective, you have options. You can migrate your Windows vCenter to the vCenter Appliance (recommended). If you already have the vCenter Appliance, you can either do an in-place upgrade, or create a new vCenter if you want to migrate your hosts over to a fresh new vCenter install. Here is more info on vSphere upgrades.

  1. Upgrade PSC
  2. Upgrade, Migrate, or deploy new vCenter
    1. Depends on current version
  3. Upgrade ESXi
    1. This will also upgrade vSAN (easy, right?)
  4. Upgrade vSAN on-disk Format (ODF)
  5. Upgrade VMware tools
  6. Upgrade vDS


As previously discussed, you will need to check the Product Interoperability Matrix to make sure all your products can run on vSphere 6.7. Don’t shoot from the hip, and start upgrading before you have done proper research.


I mentioned the choice of migrating hosts to a new vCenter. This is something I do quite often in my labs, and it is a simple process.

Migration Process Overview

  1. Export vDS configuration (including port groups)
  2. Copy licenses from old vCenter
  3. Configure new vCenter
  4. Create Datacenter in vCenter
  5. Create a Cluster and enable vSAN on it
    1. If you currently have other services enabled, they will have to be enabled on the new vCenter as well prior to moving the hosts.
  6. Add licenses
    1. Assign license to vCenter
    2. Assign vSAN license to cluster asset
  7. Create vDS on the new vCenter
  8. Import configuration and port groups to new vCenter
  9. On the new vCenter, add hosts
    1. No need to disconnect hosts on the old vCenter, they will disconnect after connecting to the new vCenter.
    2. Confirm ESXi license or assign a new one.
  10. Connect the hosts to the vDS (imported)
    1. Make sure you go through and verify assignment of uplinks, failover order, vmkernel ports, etc.
  11. Lastly, you will need to tell vSphere that this new vCenter is now authoritative
    1. You will get an alert about this


vSAN Perfomance
HTML 5 Client