What is vSphere+ ?

Today, VMware announced vSphere+ and vSAN+, but what does that mean? Is it a new version?

In simple terms, both vSphere+ and vSAN+ are offerings of the existing vSphere and vSAN products. Think of it in term of purchasing a vehicle. You know what product you want, let’s say a Porsche, but you have the option of doing a capital expense (pay cash – excluding financing for simplicity), or you can lease. The product remains the same, which in this case is the Porsche vehicle you want to buy, but the offerings are different. You can make a purchase and pay the balance at time of exchange (capital expense) or you can lease it and pay as you.

Both vSphere+ and vSAN+ allows you to purchase the same vSphere and vSAN products you know and love, but now you can move to subscription and pay-as-you-grow. This is one of the differences between vSphere and vSphere+. Both products are deployed on-premises, managed from vCenter UI, so there is no change to the way you deploy, manage and configure vSphere and vSAN. However, there are additional advantages to both vSphere+ and vSAN+.

vSphere+ does not only allow you to move to subscription(OpEx) model, but it also allows your on-premises infrastructure to the cloud WITHOUT migrating any workloads, vCenters or ESXi hosts to the cloud. Your on-prem infrastructure securely becomes cloud connected.

Once connected, vSphere+ delivers those cloud benefits businesses seek and love to on-prem. Some of the benefits include:

  • Centralized Management for ALL vCenters without limit
  • Simplified and Faster vCenter upgrades
  • Centralized Operations view of alert, event and security posture of the global infrastructure regardless of the location
  • Identify configuration drift among on-premises vCenters
  • Move to subscription from a simple centralized cloud console
  • Virtual Machine inventory and deployment to any vCenter while also being able to leverage vSAN datastores with vSAN+

These are just some of the features, and more coming soon.

vCenter Server Reduced Downtime Upgrade

I have seen some questions coming in about Reduce Downtime Upgrade features lately, so I figured I’d share some more information about this. This feature was introduced in vSphere 7.0 Update 3 and it provides a new way of doing migration based upgrades for vCenter servers.

Reduced Downtime Upgrade (RDU) simplifies the migration process and reduces downtime (as the name implies) for vCenter while the data is being moved/copied from the old vCenter to the new vCenter. So the only downtime happens when the services on the old vCenter are stopped and started on the new vCenter. The data is copied almost in a vMotion type of way. Pretty slick.

The main question I see is: Does this apply to all deployment types including On-Premises and Cloud deployments?

The answer is NO. This feature (as of right now) only applies to VMC on AWS and Project Arctic. So for now, RDU is not available/supported for on-premises deployments, but that’s not to say it will never be supported on-premises in the near future. Also RDU is only available via API at the moment, and for the VMC on AWS and Project Arctic use cases, the vCenter upgrade is done by VMware Site Reliability Engineers (SRE), so you as a customer don’t need to worry/trigger the upgrade/update of vCenter server. You can safely pass the burden on to the SREs. That alone can justify moving to VMware’s Project Arctic offering when available IMHO.

Hopefully this post answers some questions. For more information refer to the official blog post here.

My Top 10 VMworld 2021 Sessions

VMworld 2021, is fast approaching. In only two weeks we will be able to enjoy free sessions on new technology, features, and solutions. Imagine that!

I have recently moved to a new role, and I now have a little (a lot actually) more insight as to what is going on behind the curtain. I am exited for this year’s VMworld announcements about VMware partnering with vendors to deliver new, emerging tech to help customer solve their complex problems. From cost efficiency to high performance, to the cloud… I better stop before I give anything away.

I have compiled my top ten sessions. Make sure to check them out.

  1. Big Memory – An Industry Perspective on Customer Pain Points and Potential Solutions [MCL2384] 
  2. Introducing VMware’s Project Capitola: Unbounding the “Memory Bound” [MCL1453] 
  3. 10 Things You Need to Know About Project Monterey [MCL1833]
  4. Partner Roundtable Discussion: Project Monterey—Redefining Data Center Solutions MCL2379] 
  5. Project Monterey: Present, Future and Beyond [MCL1401]  
  6. Disaggregating Storage and Compute with HCI Mesh: Why, When, and How [MCL1683]
  7. VMware Cloud Foundation Tips and Tricks from the Trenches [MCL1025]
  8. How vSphere Is Redefining Infrastructure For Running Apps In the Multi-Cloud Era [MCL2500]
  9. The Big Memory Transformation [VI2342]
  10. Bring Intel PMem into the Mainstream with Memory Monitoring and Remediation [MCL3014S]

Go register for VMworld (free). See you there…

NSX Advanced Load Balancer configuration for vSphere with Tanzu

One of the pre-requisites for vSphere with Tanzu is the ability to provide a Load Balancer to the environment. THe options as of vSphere 7.0 U1 included NSX or HAProxy appliance. In vSphere 7.0 Update 2, a new option for load balancer is available for the deployment of Workload Management. The NSX Advanced Load Balancer (ALB) also known as AVI, is available for download in OVA format from my.vmware.com. Deploying ALB will allow for communication between users, service engines, load balancer type services with supervisor and TKG clusters.

Let’s jump into it. First download the OVA for NSX Advanced Load Balancer from my.vmware site.

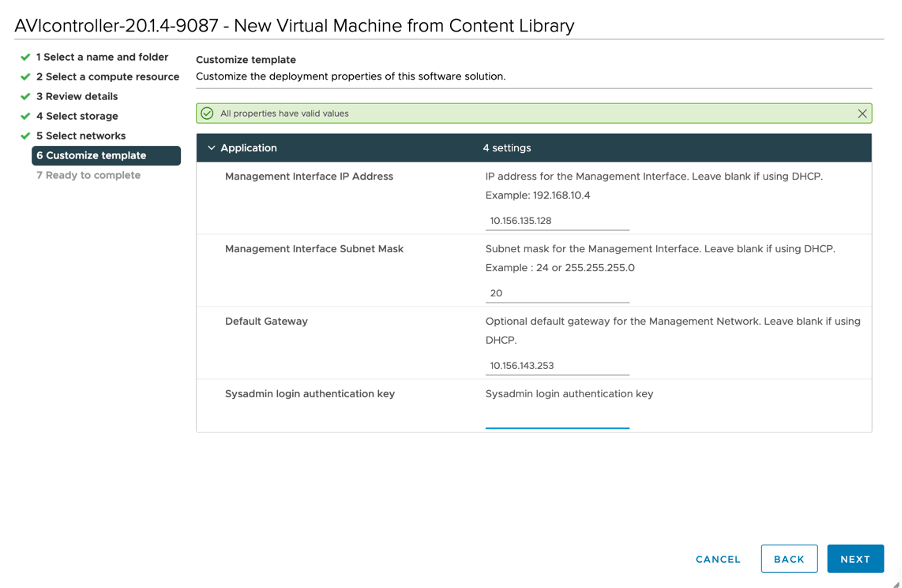
Once the OVA has been downloaded, proceed to your vCenter and deploy the OVA by supplying a management IP address.

Supplying a sysadmin login authentication key is not required.

Once the appliance has been deployed and powered on, login to the UI using the supplied management IP/FQDN.

Create username and password. Email is optional.

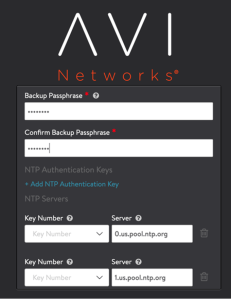
Add DNS , NTP, and backup passphrase information.

If you provided email address, you would also need to provide email settings.

You will also need to identify which Orchestrator Integration will be used. Select VMware vCenter/vSphere.

The appliance needs to know how to connect to your vCenter. Supply the username, password and vCenter information so that ALB can connect to vCenter. For permissions, you can leave “Write” selected, as this will allow for easier deployment and automation between ALB and vCenter. Leave SDN Integration set to “None”.

Select the Management PortGroup, IP subnet, gateway, and IP address pool to be utilized. This IP Pool is a range of IP to be used to connect the Service Engine (SE) VMs.

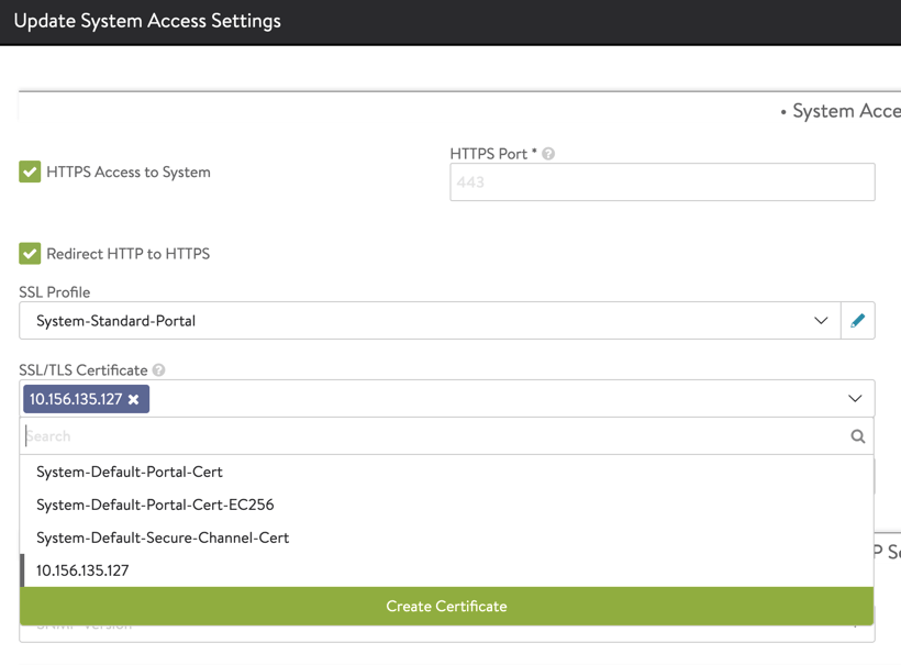
After the initial configuration, we will need to either import a certificate or create a self-signed certificate to be used in Supervisor cluster communication. For PoCs, creating a self-signed certificate is perfectly fine.

Log in to the appliance using the user/password combination specified during initial deployment.

Navigate to Administration by selecting this option from the drop-down menu on the upper left corner.

In the administration pane, select Settings.

Click on the caret under SSL/TLS Certificate to expand the options. Click on “Create Certificate” green box.

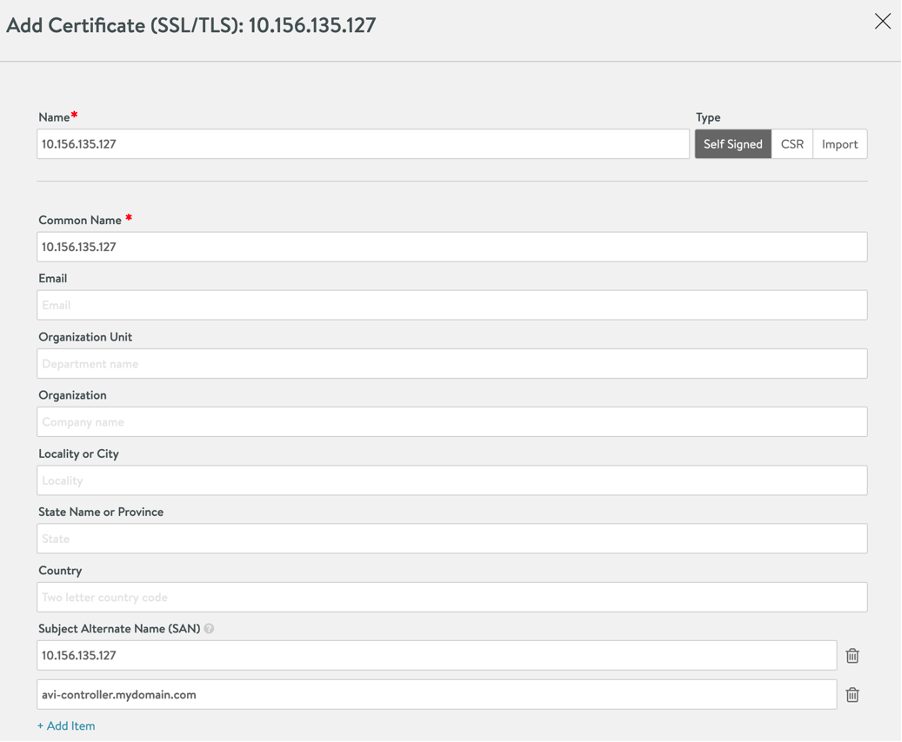
Create a self-signed certificate by providing the required information. Make sure to add Subject Alternate Name(s).

The next step is to configure the data network. Change from the administration tab to Infrastructure by selecting the option from the drop-down menu on the upper left corner.

From the Infrastructure pane, click on Networks. ALB will talk to vCenter and retrieve available networks.

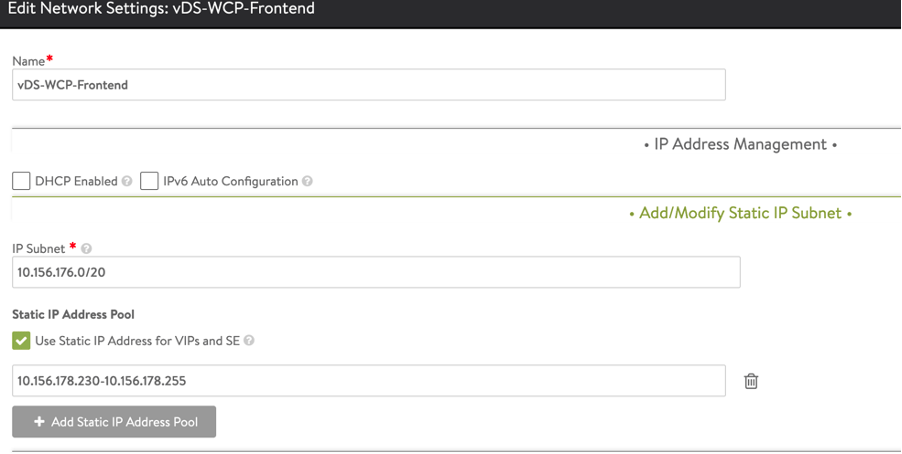
Ideally, you’ll want to create a separate PortGroup for your data network. In this example, this is the Frontend network. The Load Balancer VIPs will be assigned to Service Engines from this network. These VIPs are the interfaces that connect users to clusters and Kubernetes services.

Select the Port Group for the data network, specify an IP address, and add a static IP address pool to be used.

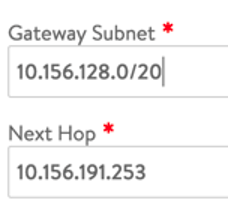
Because service engines (SE) don’t have interfaces on the workload network that Kubernetes cluster nodes are connected to, we need to specify a route. Note: VIPs are on a network accessible to the client, but the workload network may not be, so these routes enable traffic to get to the clusters.

To add a route, Navigate to Infrastructure > Routing > Create

In this example, the 10.156.128.0/20 is the Workload Network, and the next hop is the gateway for the VIP network.

Next, we need to create an IPAM Profile. This is needed to tell the controller to use the Frontend network to allocate VIPs via IPAM.

Navigate to Templates > Profiles > IPAM/DNS Profiles > create

Via IPAM profile, change the cloud for usable network to Default-Cloud, and set the usable network to the VIP network, in this case vDS-WCP-Frontend.

At this point your NSX Advanced Load Balancer Appliance is ready to be used during the configuration of Workload Management.

Dave Morera

VCF Cloud Builder: REUSE

When deploying VMware Cloud Foundation (VCF), we deploy an appliance (ova) called Cloud Builder. This appliance allow us to load the parameter file an automate the deployment of the entire infrastructure, allowing us to go from spreadsheet to full SDDC.

Cloud Builder also includes the VMware Imaging Appliance that you can leverage to build your ESXi hosts. Just navigate to https:// Cloud_Builder_VM_IP:8445/via and login with the admin credentials you set during Cloud Builder ova deployment. There are some documents out there stating to use root and EvoSddc!2016 as password but that most likely not work, at least not on newer versions available. More on VIA here.

Anyway, once the bringup of VCF has been completed, Cloud Builder will most likely not be used again, you can safely remove it. However, if you plan to deploy other VCF environments or, like me, is constantly deploying VCF on lab environments you can “refresh/reuse” Cloud Builder via a couple of options… See what I did there?!? via … like the imaging appliance.. never mind.

So the first option is to simply take a snapshot of Cloud Builder after the initial deployment of the ova and BEFORE you login to it and start importing the parameter file. Once you are done using Cloud Builder, you can simply revert the snapshot back and you can reuse the appliance again.

If you prefer not to take the snapshot or forgot to do it at the beginning, no worries. We can run a command within Cloud builder to remove previous entries and REUSE Cloud Builder.

  • su –
  • psql –host=localhost -U postgres -d bringup
  • delete from execution;
  • delete from “Resource”;
  • \q

Disclaimer: this is most likely not officially supported and hacking at the db is done at your own risk. Since this is Cloud Builder the risk is low and you can always deploy a new appliance if you mess it up, but still be careful.

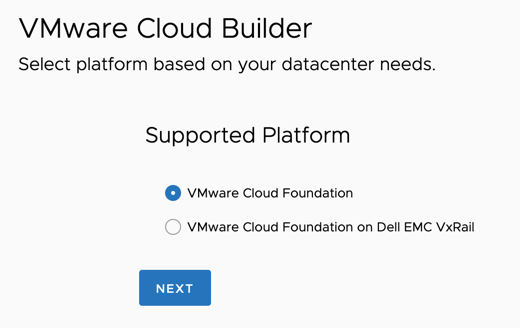
That’s it, this will remove the previous entries and next time you log in to Cloud Builder it will feel like you just deployed the appliance. Meaning that you have to go through the initial prompts, such as accepting the EULA, selecting the platform to be used, etc.

@GreatWhiteTec