Configuración de puertos UTA2 en NetApp

Puertos NetApp UTA2 es probable que sean configurados como puertos FC al recibir un nuevo systema. Al menos esa ha sido mi experiencia. Eso es perfectamente bien si va a utilizar esos puertos como puertos de FC. En el caso de que usted quisiera utilizar estos puertos como puertos de 10 GbE, tendrá que cambiar el modo de los puertos. Esta configuración se debe hacer a través de la CLI.

Para convertir UTA2 o CNA puertos a 10 GbE, tendrán que hacer los siguientes pasos.

  • Compruebe la configuración actual
  • Desactive los adaptadores
  • Cambiar el modo de los adaptadores
  • Habilitar los adaptadores
  • Reboot el node de clúster
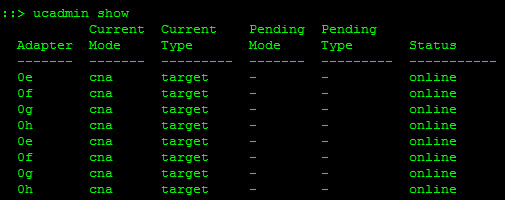
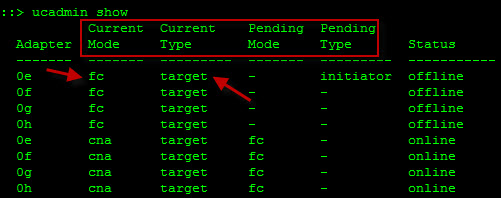
  • Compruebe la configuración actual utilizando el comando “ucadmin show“. Este comando mostrará el estado, estado actual y pendientes, así como el tipo actual y pendiente de los puertos UTA2

NetApp_UcadminShow


Deshabilitar el adaptador depende del tipo actual del adaptador

Si el tipo = TARGET use esta linea “fcp adapter modify -node <filer_node_name> -adapter 0e -state down

Si el tipo = Initiator use esta linea “storage disable adapter <adapter_name>

  • NOTA: Este es un comando de 7-mode, entoces va ha tener que correr esta linea usando system node run “system node run -node <node_name> -command <storage command>” or “system node run <node_name> y después la linea anterior.  Tantas opciones…

Cambie el modo del adaptador usando este comando”ucadmin modify -node <node_name> -adapter <adapter_name> -mode cna

NetApp_ucadmin_modify


Una vez que haya cambiado todos los modos de los adaptadores. Habilitar los adaptadores y repetir en el otro node.

Comandos:

fcp adapter modify -node <node_name01> -adapter 0e -state up
fcp adapter modify -node <node_name01> -adapter 0f -state up
fcp adapter modify -node <node_name01> -adapter 0g -state up
fcp adapter modify -node <node_name01> -adapter 0h -state up

Reinicie un node a la vez en un momento fuera del horario de producción, por supuesto. (system node reboot <node_name>)

Ejecutar “ucadmin show” una vez más para verificar todo que todo se ve bien.

NetApp_UcadminShow_done


Cisco UCS: Intro

UCS


With the overwhelming amount of marketing fluff directed to potential customers, admins, IT Managers and directors; such potential buyers are skeptical to look into new technology and often decide for status quo as far as the vendor selection.

Some potential buyers are starting to utilize social media to research and help them decide on future purchases, given their unbiased point of view. This brings me to Cisco UCS servers. For a long time I was a big fan of HP blade systems and refused to look into other technologies, and tried to steer away from unknown territory. One day I decided to look into UCS further and take one of their hands-on Gold Labs. Turns out Cisco UCS is a very well thought out solution. HP is a nice solution in my opinion but UCS delivers extra features which results in flexible solutions.

From a high level view, UCS delivers compute, server networking, and management from a single solution. Deploying servers, is as simple as assigning policies to the blade servers as far as server configs, networking policies, etc. This makes deployment fast and guarantees a homogenous deployment model.

One of the many advantages that I really like is the ability to scale out. Adding more chassis and servers do not require running additional cables to the core switches as the fabrics are already connected. New chassis are connected directly to the fabrics and that is it. Making it very simple to add compute when necessary. This is just a high level view of UCS, and I plan to write more about it now that I am such a fan of it.  I hope the information I provide may help others with their decisions and also with solutions, and troubleshooting Cisco UCS.

NetApp UTA2 Config

NetApp UTA2 ports are likely to be set up as FC ports out of the box. At least that has been my experience. That is perfectly fine if you plan to use those ports as Fiber Channel ports. In the event that you would like to use those ports as 10GbE ports, you will need to change the mode of the ports. This configuration should be done through the CLI.

In order to convert UTA2 or CNA ports to 10GbE, the following steps will need to be done.

  1. Check current configuration
  2. Disable the adapters
  3. Change the mode of the adapters
  4. Enable the adapters
  5. Reboot Cluster node

Check current configuration by using the “ucadmin show” command. This command will show the status, current and pending state, as well as current and pending type of the UTA2 ports.

NetApp_UcadminShow


Disabling the adapter depends on the current type of the adapter

IF> type=target THEN> run this… “fcp adapter modify -node <filer_node_name> -adapter 0e -state down

IF> type=initiator THEN> run this… “storage disable adapter <adapter_name>” this is a 7-mode command so you will need to run “system node run -node <node_name> -command <storage command>” or “system node run <node_name> and THEN run the command. So many options…


Change the adapter’s mode by using the command “ucadmin modify -node <node_name> -adapter <adapter_name> -mode cna

NetApp_ucadmin_modify

Once you have changed all the adapters’ modes. Enable the adapters and repeat on the other node.

Commands:

fcp adapter modify -node <node_name01> -adapter 0e -state up
fcp adapter modify -node <node_name01> -adapter 0f -state up
fcp adapter modify -node <node_name01> -adapter 0g -state up
fcp adapter modify -node <node_name01> -adapter 0h -state up


Reboot one filer at a time during non-production hours, of course. (system node reboot <node_name>)


Run “ucadmin show” one more time to verify all looks good.

NetApp_UcadminShow_done