
 Even before the release of vSphere 6, the hype for VVols has been in the upswing, and for a good reason. VVols allow for a granular management of VM objects within one or more datastores based on policies. I have written a few blogs about VVols, and also the requirements within NetApp here. I tend to write about the integration between the two vendors as I really like, and believe on their technology, and I am an advocate for both.
Anyway, deploying VVols on NetApp requires to first understand how this all works. So, with that in mind, don’t forget that this a software solution that relies on policies from both the VMware side and the NetApp side. As I explained on previous posts, deploying VVols on NetApp has certain requirements, but the one I’ll focus on is the VASA provider (VP). The VP acts as the translator between the VMware world and the storage array world, regardless of the storage vendor. Some storage vendors integrate the VP within the array others come as an OVA.
So, from the storage side, you first need to deploy the VP, and also in this case VSC, which is NetApp’s storage console within VMware. After all components have been installed, VASA will become your best friend as it will provision not only VVol datastores, but will also provision the volumes within NetApp, automatically create exports with proper permissions, and create the PE among others. The PE is a logical I/O proxy that the host sees and utilizes to talk to VVols on the storage side. In the case of an NFS (NAS) volume, the PE is nothing more than a mount point, in the case of iSCSI (SAN), the PE is a lun. Again, the VASA provider will automatically create the PE for you when you provision a VVol datastore.
Let’s start the roll out. Assumptions here are that you have already deployed VSC 6.0, VASA 6.0, and currently have vSphere 6.0 or later. On the NetApp side it is assumed that you have at least ONTAP 8.2.1 or later, and that you have already created an SVM of the protocol of preference whether it is iSCSI, FCP/FCoE or NFS, up to you.
The first thing you should do if you have both NetApp and VMware, or FlexPod for that matter, is to make sure your VMware hosts have the recommended settings from NetApp. To do this, go to VSC within the VMware Web Client, click summary, and click on the settings that are not green. VSC will open a new window and allow you to deploy those settings to the hosts. You should do this regardless if you are deploying VVols or not.

The next step is to create a Storage Capability Profile within VSC/VASA. Within the VSC, go to VASA Provider for cDOT, and select Storage Capability Profiles (SCP). Here you will create your own profile of how you would like to group your storage, based on a specific criteria. For example, if you want a criteria for high performance, you may select a specific storage protocol, SSD drives, dedupe options, replication options, etc. This is the criteria that VASA will use to create your storage volumes when deploying VVol datastores, and if you already created a volume, this is also the criteria that will be qualified as compliant for the desired VVol storage.
I created an SCP that required the protocol to be iSCSI and SAS drives, the rest was set to any. This will result in VVol creation on the SAS drives only, and under the SVM that has iSCSI protocol and LIFs configured. If there are no iSCSI SVMs this would not work. Pretty self explanatory, I hope.

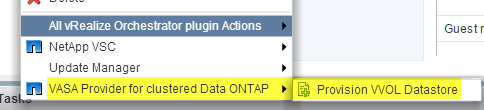
Now that the SCP is created, we can provision a VVol Datastore. Right click on the cluster or host and select “VASA Provider for clustered Date ONTAP”, then Provision VVol datastore.
Start the wizard and type the name of the VVol datastore, and select the desired protocol. Select the SCP that you want to include within the VVol, the qualified SVM(s) will be available if it matches the SCP you selected. For example, if you selected the SCP/protocol that calls for iSCSI and you only have one iSCSI SVM, that will be the only one that you will have as an option, and the NFS or FCP/FCoE SVMs will not appear. If there is a qualified volume, you may select to use it, or you may select none to create a new. If creating a new vol, choose the name, SCP, and other options just like you would from NetApp’s System Manager. You will also have the capability to add/create more volumes to the VVol datastore. The last step is to select a default SCP the VMs will use if the do not have a VMware profile assigned to them.

This will cause VASA to talk to your NetApp array and create a volume based on the SCP specified, at the same time, VASA will create the PE, which in this case is a lun. You can add/remove storage to the VVol datastore you created at a later time simply by right-clicking the VVol and go to the VASA settings. Below you can see the PE that the VP created within the volume that was created during the VVol deployment process.

The next step is to create a VM Storage Policy that points to the SCP. Once this policy is attached to a VM, it will “tell” the VM which datastore it is supposed to be on. So if you have a SQL VM on a high performance policy, you know that as long as the VM is in compliance, it will run in the high performance profile you created. To create the VM policy within the Web Client, click on VM Storage Policies, select new (scroll with green + sign), give it a name and select the vCenter. For the rule set, select the VP from the drop-down box for “Rules based on data services” and add a rule based on profile name. For the profile name option, select the SCP you created initially under VASA. This will show you what storage is compatible with this rule. Since I selected the iSCSI SCP, it will show me the iSCSI VVol I have already created. This creates the VM policy that you can assign to individual VMs.


You can also have different storage policies for the Home folder and VMDK.


Pretty cool, right?!?
I hope this helps you get started with VVols.


