NetApp 7-Mode to Clustered Mode

I recently came across a new installation of NetApp Filers and discovered that they were shipped in 7-Mode instead of the requested Clustered Mode. The problem was that most of the documentation I found was pointing to old versions of ONTAP. Since new Filers are shipped with the newest versions of ONTAP (Thanks NetApp!), I figured it would be nice to document the procedure for the switch from 7-Mode to Clustered Mode.

The first step is to setup the pre-boot environment variables. In order to be able to do this, you will need to boot into loader prompt.

  1. Boot NetApp
  2. Press Ctrl-C when prompted to halt boot process
  3. This will take you to the loader prompt. If not, you missed your chance and will have to reboot again
  4. In Loader Prompt type:
    1. set-defaults
    2. setenv bootarg.init.boot_clustered true
    3. boot_ontap
  5. These commands will set clustered-mode as the default mode


Now that we have setup clustered-mode as the default, the Filer will boot up in clustered mode, but we are not done yet. You will then need to boot up into the boot menu and initialize your drives. BE CAREFUL, as this will erase all your data. So this walk-through applies if you are working on a new filer or re-purposing a filer from 7-mode to clustered mode. If you have any data that needs to be saved, or this is a production environment, do not follow these steps. Call Support.

Booting up to the Boot Menu:

  1. If you are setting the default parameters from the steps above, wait for the filer to reboot
  2. If not reboot the Filer
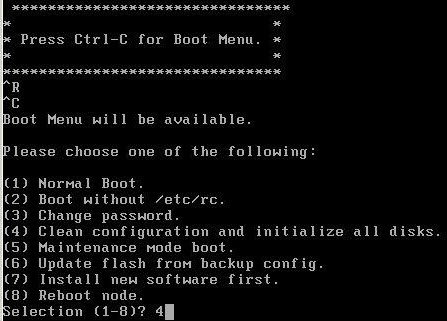
  3. As the Filer is rebooting, wait for the prompt to enter Boot Menu and hit Crtl-C to enter the menu.
  4. From this menu select option 4 (Clean configuration and initialize all disks)
    1. REMEMBER THAT THIS STEP WILL ERASE ALL YOUR DATA, INCLUDING SETTINGS SUCH AS IPs, DNS, etc.)

NetApp_BootMenu

  1. The Filer will reboot and start initializing the disks.
    1. This may take quite some time depending on the amount of drives installed.

After all disks have been initialized, the setup script will prompt for input in order to setup the “new” node.

If you have more the one node, repeat all the steps on the other node(s).


Use Cases: New Configurations. Re-purposing older controllers from 7-mode to Clustered mode.

DTv6

Not your next Internet protocol…

For those of us that like to test our knowledge with certifications, I got good news (or bad news, depending on how you look at it). VMware has released a new End User Computing certification for VMware Horizon View. This certification will validate your skills and experience with Horizon View.

The previous version (VCP5-DT), has not been deprecated as of now.

More information on VCP6-DT as well as blueprint info can be found here.

VCP6-DT

vCOPS vApp Migration to new vCenter

I really like vCOPS, as it makes my life easier. I can easily run a stress reports and show undersize/oversize percentages within a VM, among other cool reports.

Anyway, I’m migration most of my vCenters from 5.1 to 5.5, and I opted to create new vCenters since the “old” 5.1 vCenter have been in-place upgraded since 4.5. I know, I’m not a fan of in-place upgrades either. Migrating VMs from VC to VC is easy enough. Just attach the storage to both vCenters and remove from inventory from the source vCenter, then register the VMs by right clicking the .vmx file and register VM, or add to inventory depending on what flavor of UI you are using.

To migrate the vCOPS vApp, we need to remember a few key points that are important. An IP Pool is required for vCOPS. The vCOPS vApp holds critical information such as the IP addresses of the UI and analytics VM as well as the timezone and start order among other settings. Moving the vCOPS VMs is pretty straight forward, but how about the vApp?

Moving vCOPS to a new vCenter is actually really easy. You could export the entire vApp to an OVF or OVA and then import it to the vCenter. While this is the method I’ll be describing it takes quite some time to export your vCOPS VMs and it is an unnecessary space requirement in my opinion. To quickly move vCOPS do the following:

  • Write down the timezone and IP addresses under the vApp properties
  • Shutdown your vApp
  • Remove vCOPS VMs from inventory and register them in the new vCenter
  • Next you need to export your vApp to an OVF template
    • If you try to do this now, it will fail because there is no known network as described within the vApp, since the vApp has no VMs with network interfaces.
    • Just create a dummy VM as a placeholder within the same network as the other vCOPS VMs, and use thin provisioning so you don;t waste any storage.
    • This will allow you to export the vApp
  • Once you have exported the vApp. Import it into the new vCenter
  • Add the “migrated” vCOPS VMs into this vApp
  • Remove the dummy VM
  • And you are done… Well, not quite yet.
  • Remember the vCOPS requires the IP Pool aka (Network Protocol Profile)
  • So create a new IP Pool in the new vCenter and you should now be able to bring up your migrated vCOPS environment

vCOPS_vApp_prop                       vCOPS_vApp_OVF


vCenter Alarm Definition Migration

Alarms play a very important role in vCenter in order to keep the VMware admins aware of what’s going on with their environments. Even if you have vCOPS configured, I personally still like to have alarm definitions set up, specially in the event that the vCOPS vApp is shutdown, etc.

One of the use cases for alarm definition migration is the creation of a new vCenter, or even just wanting to have all vCenters configured with the same alarms. You can do all this manually, but If you have defined alarm definitions in the past, you already know this a very time consuming task and new versions of vCenter include more and more alarms as new releases are introduced. You can also have your own alarms, in which case, it make sense to have a method to copy such definition when needed.

VMware has a KB article with a script dating from 4.x version. I used this script, which works well, but it leaves out a couple of minor details that may be overlooked, specially with people with little to no experience with Power Shell and PowerCLI. In KB1032660 VMware has a script that can do this for you, all you have to do is edit the script and run it. However, the picture shows PowerShell ISE “run” button for the screen shot. In an “out of box” environment, this will fail. Why? Because this script requires PowerCLI cmdlets (connect-viserver, etc.) and those are not part of PowerShell ISE unless you import the snap-ins manually, which is totally feasible.

Error

To make the script work, you’ll have to either add the PSSnapins or run the script from PowerCLI. The easiest way is to just run the script from PowerCLI. Although this is self explanatory, I will show how to go about doing that.

Overview:

  • Download latest version of PowerCLI from VMware downloads that match your environment
  • Download the script from VMware’s site KB1032660
  • Open the script using PowerShell ISE, notepad, notepad++, or your editor of choice
  • Edit the variables for $vc1 and $vc2 and line 92 to (true), then save the script

variables

ifTrue

  • Open PowerCLI
  • Navigate to the location where you saved your script and run the script from there

navigate

  • You will get a few prompts, just hit Y [default]

At this point you should see all the vCenter alarms copied to your target vCenter server. As you add alerts to your source vCenter, you can use this script to keep all your vCenters in sync until VMware comes up with this tool.

Feature request!?!?


vCOPS Upgrade 5.6 – 5.8.2

vCOPS upgrade 5.6 – 5.8.2

Today I decided to write about one of the tasks that I consider trivial. This task; however, threw me a few curve balls.

It’s been a while since I have looked into upgrading vCOPS. My setup consists of 1 vCOPS environment per data center and they are all running version 5.6.

The first thing I noticed when downloading the upgrade PAK was that there was an additional PAK file. The OS PAK states that an OS upgrade of SLES is required in order to run vCOPS 5.8.2.

PAK_Files

Procedure:

  • Download PAK files
  • Upgrade vCOPS to 5.8.2
  • Upgrade vApp VMs to SLES 11 SP2
  • Reboot
  • Verify

To upgrade to 5.8.2, log on to vCOPS/admin and attach/upload the PAK file and click update.

vCOPS_Bundle

You will get a little pop-up message stating that you cannot revert back to previous versions. (Exchange admins should be familiar with this…).

vCOPS_confirm

After accepting the EULA… I mean reading and accepting, the status showed as failed. Looking further at the status, it was evident that there was not enough free space on the UI VM. When more space is needed for vCOPS, all you need to do is add a drive to either or both VMs within the vAPP, and vCOPS will mount the new drive and format it into the same logical drive where all the data is being stored. The normal procedure applies to adding disks. VM>Edit Settings>New Device:New Hard Disk> Assign a size and modify advanced features if needed. VMware recommends that you add Eager Zero thick drives whenever possible for better performance.

vCOPS_vApp

vCOPS_Drive2 vCOPS_Drive_Result


While vCOPS is updating, you can log back in and check the status.

vCOPS_status        vCOPS_status_after

The next step is to upgrade the OS.

In order to upgrade the OS, you will need to copy the PAK file (VMware-vcops-SP2-1381807.pak) to the data drive of the UI server. You can use SCP or WinSCP (If you are a GUI person) and copy the file. Initiate the SLES 11 SP2 upgrade by running the command below. The nice thing is that this command upgrades both UI and analytics servers in the vApp. Reboot the vApp after the upgrade and check to make sure everything looks good afterwards.

/usr/lib/vmware-vcops/user/conf/upgrade/va_sles11_sp2_init.sh /data/VMware-vcops-SP2-1381807.pak

vCOPS_sles_1 vCOPS_sles_2

vCOPS_sles_Completed


Once done, reboot the vApp and enjoy.

publickey,password error

IF… you did not check your root password before the OS upgrade and it is expired, you will need to change it. To check your password use the command: chage -l root. If you do have to change your password before/after the reboots you may run into a potential issue where you will have a key mismatch. You can ssh to/from each server to make the servers exchange keys by running these commands:

From UI VM: ssh secondvm-internal

From Analytics VM: ssh firstvm-internal

Also make sure the correct permissions are in place. Run this commands on both VMs.

usermod -G vami,wheel root

usermod -G root,wheel admin

echo “ALL : ALL : ALLOW” >> /etc/hosts.allow service sshd restart

Then follow the instructions from KB2032750

rsa