Deploying NetApp NFS Plug-in for VMware VAAI

NetApp’s NFS plug-in for VMware VAAI (VMware vStorage API for Array Integration) is an API that allows for the offload of certain tasks from the physical hosts to the storage array. Tasks such as thin-provisioning and hardware acceleration can be done at the array level to reduce the workload on the ESXi hosts.

The steps necessary to deploy VAAI on ESXi hosts as well as the NetApp storage can be accomplished using VSC or ESXi CLI, as well as NetApp’s CLI/Shell. The nice thing about VSC is that it is capable of enabling VMware vStorage for NFS on the storage and also enables VAAI on the VMware hosts if not already done.

Prior to installing NetApp’s NFS plugin for VMware VAAI, NFS datastores cannot take advantage of offloading activities such as Hardware Acceleration.

VAAI_NFS_notSupported

In order to install and configure NetApp NFS Plug-in for VMware VAAI, the following steps are necessary:

  • Enable NFSv3 on the storage system. NFSv4 is necessary for C-Mode on the export policy for VAAI to work.
    • Different methods to enable vStorage between 7-Mode and C-Mode
  • Have vSphere 5.0 or later
  • Download VAAI plug-in from NetApp site
  • Copy/Install bundle on ESXi host

Enabling VMware vStorage for NFS

VMware vStorage needs to be enabled on the NetApp storage controller. Since NetApp ONTAP 7-Mode and C-Mode commands are different, you will need to use the one for your array version.

7-Mode

Log in to the CLI and run the following command on both nodes of the HA pair.

“options nfs.vstorage.enable on

7M_vStorage_ON

C-Mode

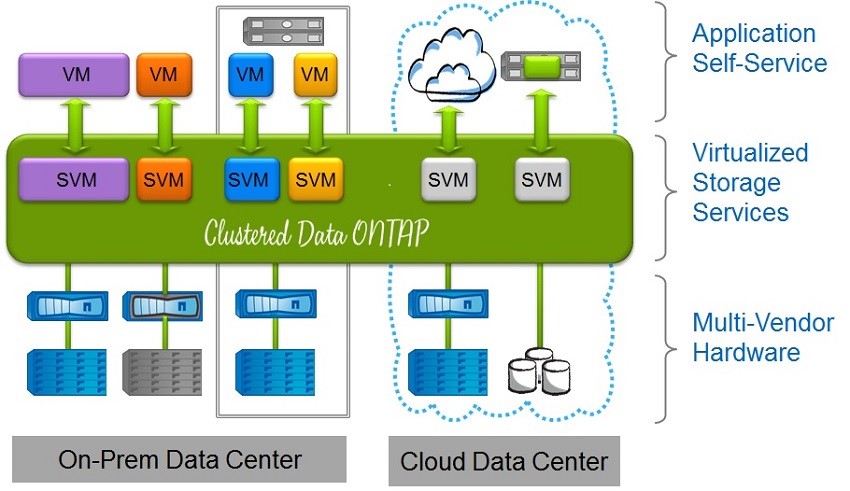
In 7-mode, the option is enabled “globally” at the controller level. In C-Mode, this option is enabled at the SVM (Storage Virtual Machine) aka vServer.

Log in to the cluster shell and enable vStorage on the desired vServer.

“vserver nfs modify –vserver <your SVM name> -vstorage enabled”

CM_vStorage_ON


Verify that VAAI is enabled on the VMware hosts

By default, VAAI is enabled on vSphere 5.0 or later, but you can verify using the following commands from the host CLI.

“esxcfg-advcfg -g /DataMover/HardwareAcceleratedMove”
 “esxcfg-advcfg -g /DataMover/HardwareAcceleratedInit”

 If VAAI is enabled, the commands will return a 1 instead of 0.

ESXi_vStorage_on

If for some reason VAAI is not enabled on the ESXi host, you can enable them by using these commands:

“esxcfg-advcfg -s 1 /DataMover/HardwareAcceleratedInit’
“esxcfg-advcfg -s 1 /DataMover/HardwareAcceleratedMove”

You can also check these settings by using the Web GUI by selecting the host>Manage>Advanced System Settings.

WebUI_vStorage_on


Installing Plug-in via CLI

You can install the plug-in via VSC or CLI. When using CLI, you can choose to use the online bundle (.vib) or offline bundle (.zip). I will show the offline bundle installation.

After you have downloaded the offline bundle, copy the .zip file to a datastore available to your ESXi hosts.

You can verify the contents of the bundle by running “esxcli software sources vib list –d <path of your .zip file>”. In this example, the offline bundle is located in the root of a datastore available to this host.

VIB_List

From the ESXi CLI, run the following command to install the plug-in

“esxcli software vib install –n NetAppNasPlugin –d <path of your offline bundle>”

At this point, the NFS plug-in for VMware VAAI is installed. Remember that the host MUST be rebooted after installation, so either use vMotion to move you VMs, or schedule some down time after hours to complete the reboot.

VIB_Install


Installing Plug-in via VSC

VSC simplifies this installation. Before you can install the plugin on an ESXi host, you will need to copy the .vib file from the offline bundle to the install directory of the VSC server. The default location is C:\Program Files\NetApp\Virtual Storage Console\etc\vsc\web. Also make sure that the name of the .vib file is NetAppNasPlugin.vib, if not, rename it so you don’t have to restart VSC or NVPF service. Don’t forget to reboot the ESXi host after installing the plugin.

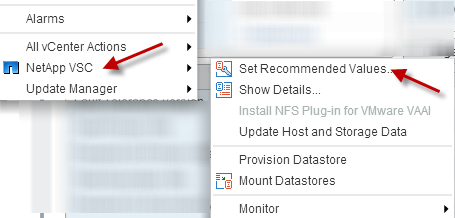
VSC>TOOLS>NFS VAAI Tools >Install on Host>Select host and reboot.

VAAI_Install_VSC

After installing the NFS VAAI plug-in, NFS is now supported for Hardware Acceleration as well as other enhancements.

VAAI_NFS_Supported

Deploying NetApp VASA Provider for VMware vSphere

As I mentioned in previous posts, NetApp’s VASA Provider for VMware vSphere allows for the management of storage through profiles, and gears towards the Software Defined Data Center (SDDC) approach.

In order to deploy VASA provider, you will need to download the NetApp VASA provider for vSphere from NetApp’s support site. There is an ONTAP 7-Mode flavor and also an ONTAP C-Mode flavor, so choose the one that matches your environment. Deploy the virtual appliance (OVA) using VMware’s client and provide the necessary information for the virtual appliance. You will also need VSC already installed in order to register the VASA provider after installation and configuration.

VASA_Settings

During the first boot, VMware Tools installation prompt appears. Mount the VMware Tools and hit enter to install VMware tools and continue installation. Change the CD/DVD configuration on the virtual appliance to “Client Device”. Provide passwords for maintenance account (maint) and vpserver account when prompted. Use the vpserver account to register VASA with VSC from the VSC configuration page by providing the IP address of the VASA provider.

VASA_Tools   VASA_Tools2

Configuration settings will appear after installation. Use the Web UI for normal use and the maintenance console (CLI) when the Web UI is not accessible. Note that the Web Console utilizes port 9083, so make sure to enter the correct TCP/IP socket when using the WEB UI.

VASA_Config

At this point, VASA has been deployed and configured. All that is left to do is register the VASA Provider with vSphere via VSC, and enjoy the benefits of NetApp and VMware integration.

VASA_Registration


NetApp VSC, VASA, VAAI for VMware vSphere: Why do I need this?

In most software meetings, round tables, and customer reviews and councils I have been part of, the feedback has been about a common topic the majority of the time. Customers want to have a single location/interface to manage multiple products. Fortunately, some aspects of NetApp storage can be managed through VMware’s WEB UI by leveraging Virtual Storage Console (VSC), VASA provider, and VAAI for VMware.

VSC is a vCenter plug-in that delivers VM management for environments running NetApp storage. VSC allows for storage configuration and monitoring, datastore provisioning and VM cloning, online VM optimization as well as backup and recovery of VMs and datastores. VSC is a very useful and convenient tool that will give you a glance of your storage status and also allow you to optimize your VMs that have not been properly aligned by migrating them to another storage target and aligning the VMDKs properly.

VSC_Main

 VSC Main Page


VSC_Align

VMDK alignment using VSC


The VASA provider for NetApp ONTAP is a virtual appliance that supports VMware’s VASA (vStorage APIs for Storage Awareness). It leverages VSC as the console and provides information to the vCenter about NetApp Storage that has been associated with VSC. VASA allows for the management of storage profiles defined as Service Level Objectives (SLO) as well as alarms to monitor the NetApp environment when aggregates and volumes are nearing their storage capacity.

The last piece of the puzzle is VAAI. VMware VAAI (vSphere Storage APIs – Array Integration) allows for hardware acceleration and offload certain operations that originally occurs at the host level, to the storage system. This reduces the overhead and consumption of resources on the ESXi host and improves performance. VAAI is great for speeding up I/O operations on the VMware side.

You could pick and choose which of these components to install as you see fit, but ideally you would want to deploy all three to take advantage of these enhancements and integration. The VSC software is installed on a server and associated with a specific vCenter. The NFS plug-in for VMware VAAI is installed on each VMware host and the VASA provider is deployed as a virtual appliance. It is important to point out that VSC  can also be utilized to set NetApp’s recommended values on ESXi hosts for better performance.


VSC_Logo

VSC_HostOptions

 VSC ESXi Host Options


VSC_VM_Options

VSC VM Options


Storage Virtualization: Yep, NetApp

Just as VMware has been the pioneer for server virtualization, NetApp seems to be the virtualization player to beat in the realm of storage at this moment. Although NetApp’s ONTAP Cluster Mode (C-Mode) is not a new release, it is taking some of the legacy, 7-mode users some time to not only understand, but also implement C-Mode given its complexity compared to 7-mode. But an easy way to think of C-Mode, is to find the similarities with VMware’s vSphere.

Cluster mode breaks apart the physical aspect of the storage into a virtualized setup where several virtual storage environments can be created to segregate the diverse logical configurations. C-Mode can be a great use case for a public cloud service provider where the segregation of storage virtual machines is necessary; but let’s keep in mind, that this kind of segregation can also be heavily utilized within a private environment for many use cases.

Having recently achieved a master’s degree in Cyber-security and Information Assurance (CIA), I learned a few things about securing not only public environments, but also making sure we are internally secure. Your company is only as strong as its weakest link. After all, a great number of the attacks are generated internally by users with lack of knowledge or even malicious users. Through storage virtualization and the segregation of storage virtual machines, we can achieve not only better security but also better management through the use of policies.

NetApp_Stor_Virt


This virtualized storage environment allows for a more direct relationship with virtualized server environments such as VMware, where more granular control is needed. In my humble opinion, NetApp C-Mode and VMware vSphere are not that much different from each other. As I was preparing for my NCDA certification for NetApp (C- Mode), I couldn’t help but notice the similarities in their architectures. C-Mode acts as the Hypervisor, or in this case vSphere, and both platforms have virtual machines that act as independent identities. Such identities have their own personalities such as IP addresses, login information, mappings to a physical underlying network, etc.

While VMware uses servers for the physical platform, NetApp C-Mode uses their hardware and data ONTAP software to deliver storage virtualization; that once joined with VMware, become an extremely powerful solution for businesses of all sizes. Clearly, I am drinking the NetApp cool-aid, but I believe their technology in addition to VMware’s products make up for great SMB, and enterprise solutions. The two companies provide even better integrations and solutions through the use of VASA, VAAI, VVols, VSC, etc. More on them soon…


NetApp UTA2 Config

NetApp UTA2 ports are likely to be set up as FC ports out of the box. At least that has been my experience. That is perfectly fine if you plan to use those ports as Fiber Channel ports. In the event that you would like to use those ports as 10GbE ports, you will need to change the mode of the ports. This configuration should be done through the CLI.

In order to convert UTA2 or CNA ports to 10GbE, the following steps will need to be done.

  1. Check current configuration
  2. Disable the adapters
  3. Change the mode of the adapters
  4. Enable the adapters
  5. Reboot Cluster node

Check current configuration by using the “ucadmin show” command. This command will show the status, current and pending state, as well as current and pending type of the UTA2 ports.

NetApp_UcadminShow


Disabling the adapter depends on the current type of the adapter

IF> type=target THEN> run this… “fcp adapter modify -node <filer_node_name> -adapter 0e -state down

IF> type=initiator THEN> run this… “storage disable adapter <adapter_name>” this is a 7-mode command so you will need to run “system node run -node <node_name> -command <storage command>” or “system node run <node_name> and THEN run the command. So many options…


Change the adapter’s mode by using the command “ucadmin modify -node <node_name> -adapter <adapter_name> -mode cna

NetApp_ucadmin_modify

Once you have changed all the adapters’ modes. Enable the adapters and repeat on the other node.

Commands:

fcp adapter modify -node <node_name01> -adapter 0e -state up
fcp adapter modify -node <node_name01> -adapter 0f -state up
fcp adapter modify -node <node_name01> -adapter 0g -state up
fcp adapter modify -node <node_name01> -adapter 0h -state up


Reboot one filer at a time during non-production hours, of course. (system node reboot <node_name>)


Run “ucadmin show” one more time to verify all looks good.

NetApp_UcadminShow_done